Friday, January 29, 2010

Going Slow for that Silky Flow of Water


Greetings to all,

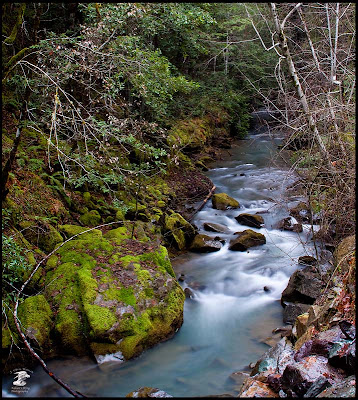
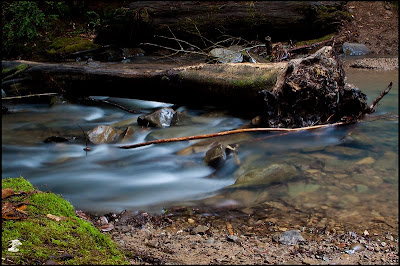
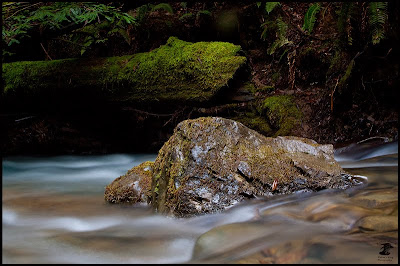
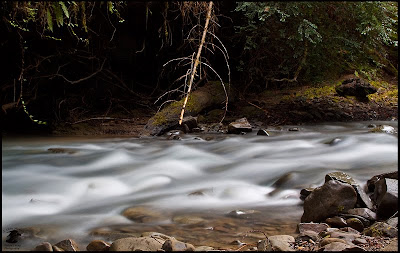
It's old news to many and its almost or probably a cliche' but some people like to blur their waterfalls or water so it looks like flowing silk. It's not that difficult to do it just requires the right water, weather and equipment. For weather the best times are when it is overcast, cloudy or foggy. The other circumstance is when there just plain isn't a lot of bright light like early morning or late afternoon or being in a dark shaded area like a canyon. Equipment wise you can decrease the light to help this along by the use of a filter called a ND or neutral density filter. These are sold in varying powers that cut down on the amount of light reaching the light sensor in the camera. These typically come in one , two or three stop densities with some expensive ones even cutting out more light. So by placing one of these filters in front of your lens you need to increase your exposure time which is just what you need to do in order to blur water out to a silky flow.


To blur water typically you need to blur it with a shutter speed of 1/15 of a second or longer depending upon the water flow. This means you need to use a tripod or other camera support such as a ground pod or bean bag placed upon something. Usually in order to get such a slow shutter speed you are going to have to put your camera on Manual or Aperature Priority and choose an F stop that is closed down as much as possible for the lighting conditions. I start by making a check with the f stop at about f11 and keep closing down further and further until I get the look I like. Often times in the dark canyons I'm shooting in I will get an exposure of f22.0 at around thirty seconds. You really need a solid tripod for that.


When shooting look for interesting rocks, logs and stream flows to help you with your compositions. Try finding things that will work as anchors in your foreground of the image as well as diagonals that will lead the viewer into the image. Above all experiment and have some fun. Check your histogram often to see what kind of results you are getting. Personally I tend to like to underexpose my images just a little bit as the streams where I live have very dark rocks in them. Be careful of getting direct sunlight into your compositions as there is usually too much contrast for your camera to be able to handle.

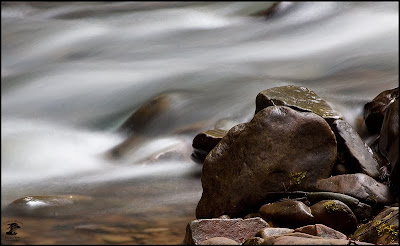
I shot these images today as kind of a challenge to myself. I took only one lens a 28- 105 zoom my 50D a remote release to keep things steady and a ground pod. The conditions were perfect for what I wanted to do. It was cloudy and getting ready to rain. I slid down into the creek bottom and just had fun looking for interesting rocks, logs and riffles to shoot images of. By the time I had walked up stream awhile it was strarting to rain and I hightailed it out of there. Most of my exposures were taken at F22.0 from 3.2 to 10 seconds. There is only one shot that I did differently and that was the one cropped to a panorama. The exposure for that image was F3.5 @ 1/10th of a second.

The other thing you can do is to shoot multiple images of the same scene without moving the tripod and then later combine them so that you end up with a sliky smooth look combined with the fast stop action look of a faster shutter speed. Just be sure to not move your camera or tripod when changing the cameras settings.

So get out there and shoot some images of this glorious planet that God has created for us and above all have some fun.

chris

Tuesday, January 26, 2010

Getting Down and Dirty


Greetings to all,

Often times the best perspective to photograph wildlife is from the same height as their eye level. For a lot of critters this isn't much of a problem. Deer, elephants, bison etc. often times are at the same or a even higher level than we are. So for those types of critters getting to eye level isn't difficult. Besides these are just guidelines anyway which are meant to be broken once in awhile to be creative in the image making process. However, for today we are going to stick to the guidelines and discuss the job of taking the portraits of shorebirds. For this it means getting down and dirty. Smaller creatures like ground squirrels, lizards and shorebirds have an eye level of well let's just say it is below the knees. Please note that a lot of the things being covered here about shorebirds apply to many small ground dwelling creatures especially the perspective.

So how do you approach this kind of photography? Well if you are physically able enough from your belly. You have got to get down and slither and crawl. Put on some old clothes or some waterproof gear and get down on your belly and crawl. This can lead to some interesting locations and situations. Shorebirds inhabit a diverse range of habitats from grasslands and beaches to mudflats. Grasslands aren't so bad but mudflats. So how do you photograph in these less than desirable locations?

I guess it depends upon your dedication to the art of photography as well as your technique and the proper equipment to be used. Many photographers set aside clothing to be worn in the mudflats or on the beach. When they arrive at the scene they change into chest waders or rain gear or just plain old clothing they don't care much for anymore At the end of their photographic session they change back into the clothing they came in and stow their soiled clothing in a plastic bag or container to be washed off and dried later at home. There are many choices in clothing check with most any outdoor supply store or sporting goods store to see what is available in. There is also the Thrift Store if you decide upon wearing clothes that you don't care too much about.My personal preference is stocking foot neoprene chest waders and an old army jacket from a garage sale.

So what techniques are used? There are two main ones used along with a combination of them both. The first is progressive approximation. This involves finding a subject to be photographed and slowly crawling towards your intended subject very slowly. ( in mudflats this can be a grimy, smelly experience) Stopping frequently to allow your subject to adjust to your being close by. Every animal has its personal space and it will tend to move further away from you when that space is violated. With careful observation you can often observe an animals behavior to see when they are feeling comfortable or being stressed. Shorebirds for example will stop feeding, stand erect, turn their bodies away from you in preparation to fly. The second method is find your intended subject and observe its possible direction of travel . The goal here is to seek out a location ahead of it and wait to photograph your subject when it passes by.

While you are crawling along one of the key things of importance here is to keep your hands and equipment clean . Many photographers carry along a towel or two for that very purpose.So where is your camera during all this crawling about? In keeping your equipment clean one technique often used is to push your camera and tripod or ground pod along on the ground,mud or sand ahead of you. Using it as a brace to keep your hands and camera up out of the muck. Commercially there are many types of ground pods available. The best types for mud and sand are those that resemble frying pans. They work well because you can push them along the mud and keep your equipment clean and dry.

A back pack or fanny pack is a useful item to have along as well. You can store your dry towels and other needed equipment sealed up in a dry bag or other sealed container ready for your use. though some shooters keep things to a minimum and only bring a few needed items which they store in the pan of the ground pod.

So get out there and get down dirty and create some beautiful images in the process. Oh and don't foget you can use a low perspective for a lot of other things besides wildlife.

God's light and love to all,

chris


Because the ground pods above resemble frying pans it is relatively easy to make one using a frying pan from the thrift store and mounting a tripod head inside of it for your camera to sit on. First off I would suggest doing a search for camera ground pods to get an idea of what size pan might work for you. After that I would hit the thrift stores and find one that is similar in size to one you are interested in. Also, hit the hardware store for either a 3/8" or 5/8' bolt of the same size and length that is on the top of your tripod legs. You do have a tripod don't you? The next step is to drill a hole in the bottom center of the pan. Check your tripod head to see if it is either 3/8'' or 5/8' as these are the most common sizes.

After drilling the hole slide the bolt into the hole and mount your tripod head on it and you are ready to go. If the tripod head is too low you may have to add a wooden spacer between the tripod and the pan. A spacer can be easily cut out of exterior plywood of varying thicknesses or out of some other type of lumber. As a final step you may or may not want to spray paint your new Mud Scooter to give it a more polished look. go out and have some fun with it.

Monday, January 25, 2010

Auto Blind


Greetings to all,

The second most expensive blind I own is my car. Well technically the bank owns part of it. The most expensive one is my house. Problem with my house though is that it doesn't move and my car does. For many of you using an automobile as a blind is old news. For others of you new to wildlife photography it's not.

A lot of wildlife is totally unafraid of vehicles. They zoom past them day in and day out.Many animals especially deer love to use the open spaces next to roadsides in the early mornings and late evenings to feed. Birds of prey often use fence and utility poles beside the road as perches. Because of this vehicles can be another tool in your arsenal of photography tools. Just be sure to use it safely. That's important to be said because you are still using a motor vehicle and you don't want to endanger yourself or others in the pursuit of a wildlife image.


The first step is to prepare your camera in advance and place it securely in the car somewhere close to you. I keep mine in an open cooler on the floor of the passenger side of the car. I wouldn't recommend keeping it on the seat next to you as I have learned from a serious repair bill that telephoto lenses don't fare well in emergency stop situations. Ouch. Also the use of a bean bag or a window mount for your camera can be set up in advance. Window mounts are available commercially and can be a superb tool to keep your images sharp. Bean bags are also available though it is very easy to make one of your own by stuffing a fabric bag full of beans or rice. More on that one some other time.

When you see an animal on the side of the road first check to see if there is plenty of room for you to completely pull of to the side of the road with your vehicle off of the roadway. Second if it is dry or in summertime make sure there is no dry grass for your vehicle to set on fire. Give traffic behind you plenty of time to be aware of your intentions. Ease off the side of the road with no jerky braking and slowly come to a gentle stop.If you are in a good position turn your engine off to reduce vibration in your image. Hopefully you already have thought of having your window down. Shooting through windows doesn't usually yield very fine results. Slowness is often the key here so don't flail away with your camera and spook the animals off. Ease your camera up to the window place it on a bean bag or camera mount and compose and shoot.

Other people in the car can be both a God send and liability. If you have an agreeable mate they can drive and you can set up in the passenger seat with your camera ready to go. You have your own personal driver. This is especially helpful when doing the auto tours at many wildlife refuges where you are not allowed to get out of your vehicle. They just drive slowly and you tell them where and when you want to stop. Having a driver is very effective for hawks and other raptors. Many times they will immediately fly off when a vehicle comes to a stop. So if you prefocus on the bird before you come to a stop you can get some mighty fine images.

The liability of another person in the car is the shakes. Any motion in the car can result in unsharp images. My children have gotten to know that when Dad is taking a picture from the car they are to remain motionless. Pretty hard to do when they were much younger. which is why sometimes we just stopped and looked at the animas and dad didn't take any pictures. So keep in mind vehicle movement when shooting and that includes motion from the wind.

So if it is rainy or snowy or maybe you are just feeling cabin fever get out there and create some images.

God's light and love to all,

chris

Thursday, January 21, 2010

DIY Auction Pics


Greetings to all the image makers out there,

If you only infrequently sell stuff on internet auction sites then this will be beneficial. Many times when I'm photographing simple objects I don't want to go to the hassle of setting up all the lights and product photography boxes etc. I just want something I can do in less than 10 or 15 minutes or so.

The simple solution is to make a sweep out of tagboard in whatever colored background you desire. A sweep is a fancy photography word for a background that doesn't have corners or creases showing. Tagboard is available in a multitude of colors from office and art supply stores. I buy mine at you guessed it the Dollar tree for 50 cents a sheet. (hear that Dollar Tree Execs?) To make a sweep all you have to do is lean the tagboard up against something on a table top and tape the top to hold it in place. Nothing complicated to it at all. Look at the set up picture to see what I mean

I set the object to be photographed towards the middle front of the tagboard. I put my camera with a flash mounted on it on a tripod at a height close to and higher than the object I want to photograph. I wrap the flash head with a napkin to diffuse the light some. I just wrap the napkin on with a rubber band. The next step is to set the white balance on my camera to flash. Following that I set the camera setting to Aperature Priority and I set the cameras f stop to f22.0 for maximum depth of field. I then focus on the front of the object to be photographed and fire away. OOOPS. But not first after shutting off all the kitchen lights to help prevent color casts from them being in the image. It's that simple and it doesn't cost an arm and a leg for a product photography kit or take up your whole afternoon.

Good luck and God bess you,

chris

Wednesday, January 20, 2010

It's a Dollar Tree Kind of Day


Greetings to all you image makers out there,

Some days just don't work out for photography due to the weather or an illness in the family. On those kind of days I like to curl up and read a good book, work on images on the computer or go to Dollar Tree. Yes, that's right go to Dollar Tree. This morning as I was taking my daughter to school it was pouring down rain mixed with sleet. After dropping her off I decided to go to the local Dollar Tree ( Hey corporate guys at Dollar Tree you need to pay me for this!) and randomly pick out some stuff to photograph.Today I picked out some white tagboard and some mylar wrapping paper for use as a backgrounds. I also grabbed a green vase,red tinsel,a velvet box, a can of soup and yes a garden trowel. To top it off I grabbed some party hats, some beads and whistles. If you are new to my blog you can look back at my post of where I show how to make a product photography box out of foam core from the Dollar Tree.

http://diyphotocheapodepot.blogspot.com/2008/06/diy-product-photography.html

When I got home I set up some lights and began to photograph the items first by themselves and then I grouped some of them up. It was a lot of fun and I ended up with some pretty cool images that I can use for cards and what not to send to friends. It's good practice for product photography or putting images on ebay or Craigslist as well.

So when you have a rainy day or just need something fun to do just hit your local Dollar tree or 98 cent store and find some fun stuff to photograph.

God's blessing and loveto all,
chris

Friday, January 1, 2010

On the Water


Greetings to all and a Happy New Year,

Do you live in an area where you just can't get close to wildlife or birds. If you are like me the answer is yes. I get really annoyed when I see all these cool bird images that are taken in Florida. If you have ever been to Florida to photograph birds then you would know that there are many, many locations where you can walk right up to birds. I really do mean walk right up to them. I'm not saying it's easy photography but it sure makes it a heck of a lot simpler to do.

Here in Northern California usually the closest I can approach a great blue heron is about a hundred feet. Much closer if I use my car as a blind. But there is another way that you can typically get a lot closer and that is by using a small boat such as a kayak, canoe or small electric boat. A floating blind works really well too . But that is a topic I have covered in a previous blog.
For some reason most birds and wildlife don't typically view things approaching them from the water as a threat. last time I was out in my little electric photo boat I was able to get less that 20 feet away from some otters. Turtles were unafraid of my boat and I was able to get so close that I had to back up the boat as I couldn't focus that close. Western Grebes would nervously swim away when I got to less thirty feet or so. In summary I could get fairly close camera range to most of the wildlife i encountered while out on the water.

The simplest approach is get upwind or up current and slowly float into your subject. Keep in mind the lighting direction and keeping all movements to a minimum. Additionally you want to keep your profile low in the boat so as to not skyline yourself and movement seen by your subject. Also since you are photographing on the water it is usually best to keep you camera angle as low to the water as possible. This means bracing yourself on the gunwales of the boat or using a bean bag. Sometimes I use a tripod but for the most part I usually use a bean bag.

When photographing from a boat special care must be used with your valuable camera equipment. I always carry a dry towel to wipe off any paddle splatters or stray water. I never put my camera on the bottom of the boat. Instead I keep it in a small cooler if I am in my photo boat. It is readily available at my feet at a moments notice. If I am in a kayak or a canoe I prefer to use a dry bag or a waterproof case. Personally I prefer a waterproof case over a dry bag just because for me they are easier to access and open as well as keep organized.

Today my wife and I picked up a new kayak. We purchased a Native Watercraft Ultimate 14.5 Tandem. They are one of the most stable kayaks out there and they are great for photographing from. It will be nice over the next year to get out and photograph from it. Previously I have been using a Mendocino Kayak that is very stable. But it is a sit on top and every time i used it I could hardly walk as my back hurt so bad from the seat position. i really wanted a Slo Mo Kayak but I have the needs of my family to consider so a tandem it was. Below are links to both of their sites.

Good luck out there creating images and God bless,

chris

http://www.nativewatercraft.com/

http://www.slomoboats.com/